Here’s a list of common issues regarding ThinPrint Mobile Session Print and tips how to solve them.
Mobile Session Print server can’t be registered again
If the Mobile Session Print server can’t be registered on TPNS (anymore) – for example, after moving to another e-mail domain – perform a new (clean) registration by installing Mobile Session Print on a new machine to trigger a new registration there.
If this is not possible, contact ThinPrint support.
Mobile devices can’t be registered
If you can register the Mobile Session Print server on TPNS successfully but not the mobile devices, check on the Mobile Session Print server whether the ThinPrint root certificate
ThinPrintMobilePrint Instance CA
can be found in the certificate store in
Certificates (Local Computer)\Trusted Root Certification Authorities\Certificates
If not, copy it from
Certificates (Local Computer)\Personal\Certificates
to
Certificates (Local Computer)\Third-Party Root Certification Authorities\Certificates.
Error messages
Exception – The underlying connection was closed: An unexpected error occurred on a send. Unable to read data from the transport connection: An existing connection was forcibly closed by the remote host. (Code 00000000)
- Cause: You may not have a certificate selected on the Mobile Session Print or proxy server for the https binding, that’s why the server doesn’t accept any connections.
- Solution: Check the IIS configuration on the Mobile Session Print server and, if necessary, on the proxy server, and make sure that a valid certificate for the https binding is specified which is suitable for this server.
Enabling trace logging for proxy or Mobile Session Print server
Note! Enabling Trace logs will affect the performance. So, disable logging if no longer needed.
– In Server Manager, enable the Failed Request Tracing with Web Server (IIS)→ Web Server→ Health and Diagnostics→ Tracing.
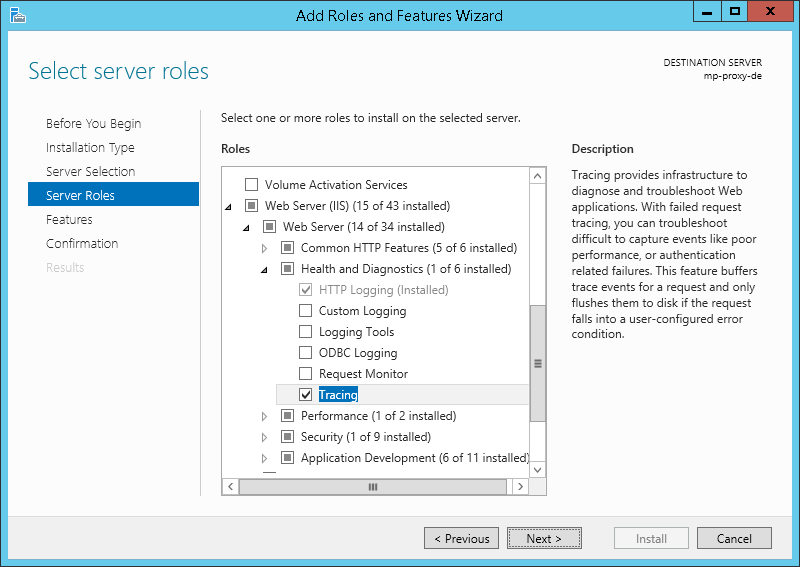
Server Manager: enabling the IIS role feature Tracing
– Open the IIS Manager, select the relevant server and open Failed Request Tracing Rules.
IIS Manager: selecting Failed Request Tracing Rules
– Click Add.
Failed Request Tracing Rules: selecting Add
– Select All content and confirm with Next.
Failed Request Tracing Rules: selecting All content
– Enter 401 as status code for logging. Proceed with Next.
Failed Request Tracing Rules: entering status code 401
– Enable exclusively Verbose for WWW Server, and keep on all options of the Area group. Confirm with Finish.
Failed Request Tracing Rules: configuring WWW Server
– To give the log file’s storage location, select Failed Request Tracing for the Default Web Site or for the relevant subpage.
IIS Manager: selecting Failed Request Tracing
– Select Enable and confirm the log file’s storage location. Confirm with OK.
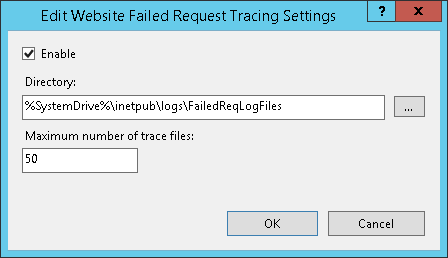
IIS Manager: giving the path to the log file