For the installation of single components, see the Quick Installation guides of Management Center and ThinPrint Engine on print servers.
Network printers
Preconditions
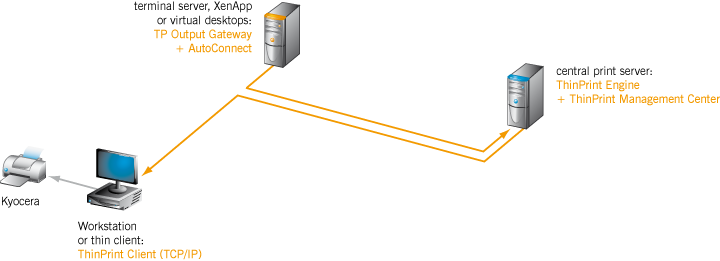
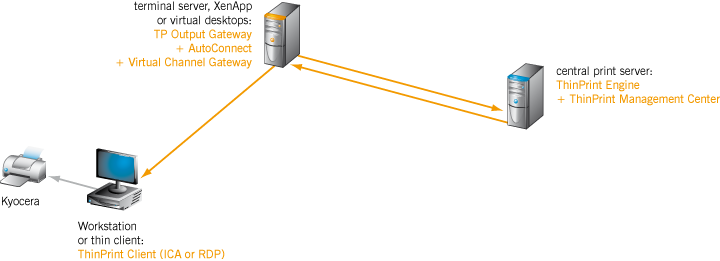
- Installed on terminal servers (alias Remote Desktop Session Hosts) or on virtual desktops are:
- the virtual printer driver TP Output Gateway (v8.0 or later)
- the ThinPrint mapping component AutoConnect (v8.0 or later)
- The ThinPrint Engine (v8.0 or later) is installed on the central print server.
- Installed on the local print server are:
- printers
- ThinPrint Client (TCP/IP type)
Alternatively, devices with integrated ThinPrint Client can be used (e. g. ThinPrint Hub or TPG-125 from SEH).
- Management Center is installed on a separate computer or on the central print server.
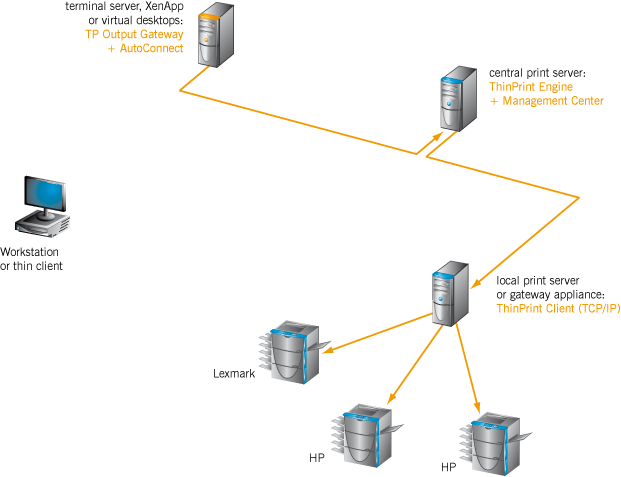
path of the print data: desktop→ central print server→ local print server→ printers
Procedure
- In Management Center’s configuration console set up an object for the ThinPrint Clients of a branch. To do so, select Locations→ New. Enter the name of the branch (here: Helsinki), and click Create and Close to confirm.
setting up a Location
entering the name of the branch
- Set up the local print server. To do so, select All ThinPrint Client Devices→ New. Enter the hostname of the local print server (here: lps-8), choose the location (here: Helsinki), and click Create and Close to confirm.
adding a ThinPrint Client
entering host name (or IP address) of the local print server
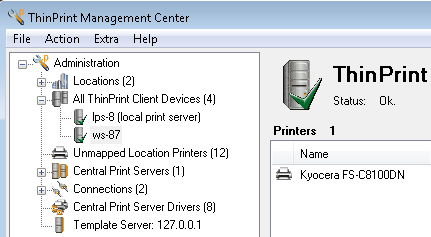
- Request the printer list of the ThinPrint Client that runs on lps-8, using the command Get Configuration. Click OK to confirm the subsequent notification. The printer list will be displayed.
importing ThinPrint Client’s printer list with Get Configuration

printers of lps-8 are displayed
- Set up the central print server. To do so, select Central Print Servers→ New (upper arrow). Enter the host name of the central print server (here: vmee-n0ps) – for failover clusters, enter the name of a print spooler instance. Click Create and Close to confirm.
Note! After adding a new print server, always click immediately on Get Configuration to determine if the print server is reachable.
adding a central print server
entering host name or IP address of the central print server
- Set up an object for the Connection settings (which will be stored in the configuration of the ThinPrint Ports). To do so, select Connections→ New. Enter the name of the Connection – e. g. that of the branch – (here: HLSNK), select the central print server and the location, and click Create or OK to confirm and Close.
adding a Connection
Caution! To avoid database errors with creating a new Connection please note the following:
• Do not use the underscore character ( _ ) in the Connection name.
• Avoid entering the same Connection name twice.
New Connection with settings
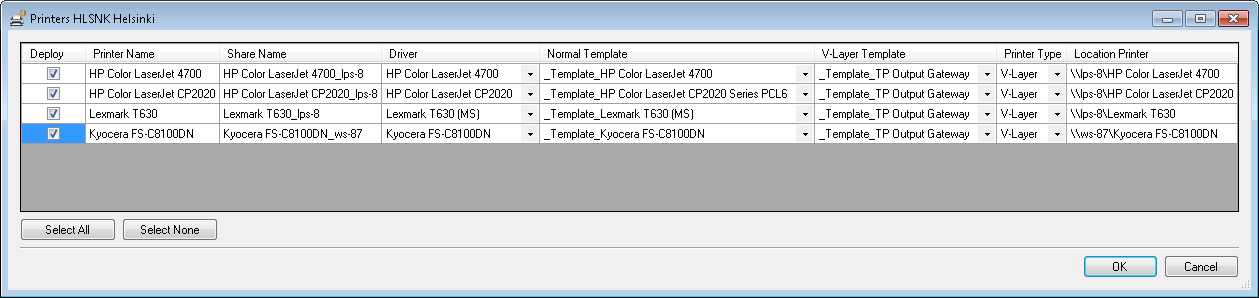
- Now set up the printer objects. To do so, select Edit Printers in the Connection’s context menu (here: HLSNK). Enable the selected printers (all with Select All), and for each one, enable V-Layer (Printer Type column). Assign to each printer a native driver and a template (Normal Template column) as well as an Output Gateway template (V-Layer Template column). Click OK to confirm. (The V-Layer print mode is recommended for sending print data to non Windows clients as well as to centralize all printer drivers on the central print server.)
selecting Edit Printers for this Connection
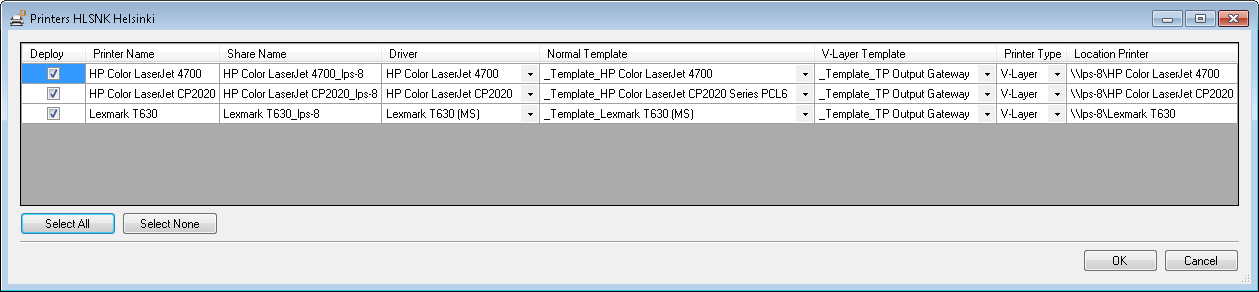
Select All and V-Layer and then the templates of the native drivers (Normal Template) and of Output Gateway (V-Layer Template)
Create printers on the central print server
The newly selected printers are then automatically set on the central print server:
- To create the printer objects, select Apply Configuration for the central print server or for the relevant Connection. Click Yes and OK to confirm the subsequent notifications. The result appears in the printers folder of the central print server. In the session, both Output Gateway objects of the V-Layer pairs can be connected at the same time, here:
Lexmark T630_lps-8 and HP Color LaserJet 4700_lps-8
selecting Apply Configuration for the central print server
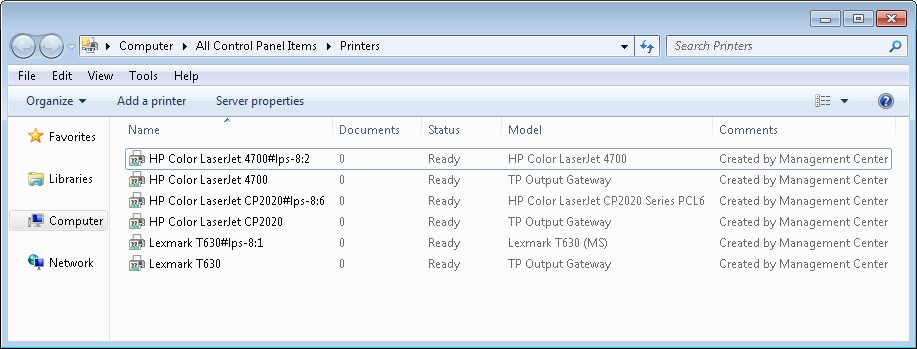
result: three V-Layer printer pairs have been applied to the central print server (here: one Lexmark and two HPs)
Configuring AutoConnect
The ThinPrint component AutoConnect connects the above applied printers into a session on a terminal server or a virtual desktop (= printer mapping).
AutoConnect has two tables to set up the mapping rules:
- Dynamic Printer Matrix and
- Map Additional Printers
Dynamic Printer Matrix is the more comfortable operated of the two tables. It assumes that the required information for processing the mapping rules can be requested. Consequently, AutoConnect attempts to create in a session, exactly one printer object for each printer for which it received a report from ThinPrint Client.
In contrast, when using the table Map Additional Printers, all printers that are in the table and for which a rule applies, are created in the session, regardless of the presence of a ThinPrint Client.
Alternative 1 • Dynamic Printer Matrix
| advantages | • printer names don’t have to be entered • rules can be imported from Management Center |
| disadvantage | requires ThinPrint Client |
You don’t have to completely enter the contents of Dynamic Printer Matrix all over again. You can export it from Management Center, import it into Dynamic Printer
Matrix and then just edit it there, if required. Do this by the following method:
- In the Central Print Servers node of the Management Center’s configuration console select the menu item Export to CSV.
Enter a file name, and click Save to confirm.
selecting Central Print Servers→ Export to CSV
assigning a file name and click Save
- Switch to Dynamic Printer Matrix on the terminal server or in the group policy configuration. Select Import Configuration there (upper arrow) and then select the newly exported .csv file. Click on Open (lower arrow).
Caution! An existing configuration will be overwritten.
selecting .csv file and click on Open
- The new Dynamic Printer Matrix configuration appears. Click on OK to close the Dynamic Printer Matrix.
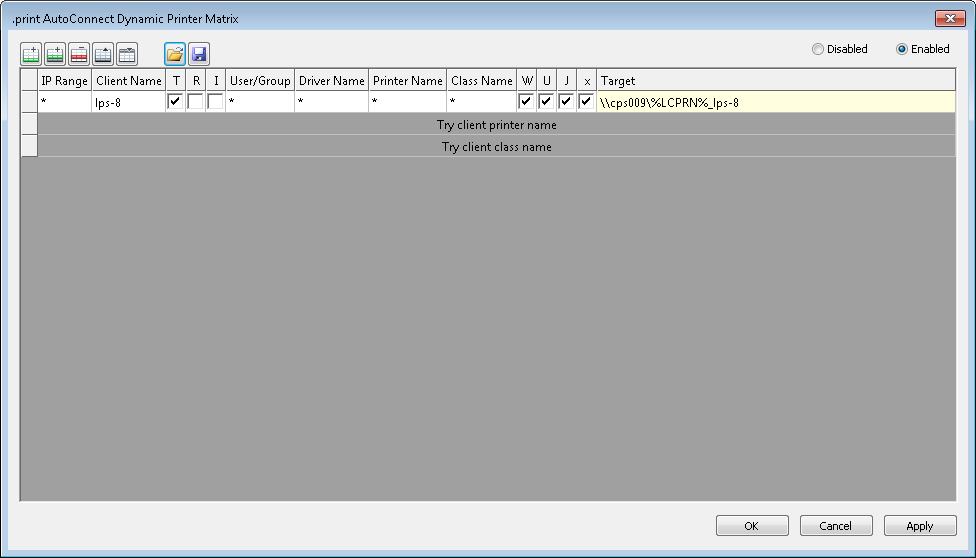
Dynamic Printer Matrix: Management Centers configuration has been imported
- Create logon scripts with the following content, for the users (example):
tpautoconnect -a lps-8
- Create logoff script for all users with the following content:
tpautoconnect -d
connecting printers with AutoConnect (here: on the command line)
- Perform an update of the group policy for the terminal server and/or virtual desktops.
- Start a session on the terminal server or virtual desktop and perform test prints on the automatically mapped printers.

Printers mapped in a session by AutoConnect
Alternative 2 • Map Additional Printers
| advantage | ThinPrint Clients are not required |
| disadvantage | a rule has to be entered for every printer |
- Switch to Map Additional Printers table on the terminal server or in the group policy configuration. Enable the table with Enabled (top right in the screenshot) and create a rule for each printer to be connected. Click on OK to close.
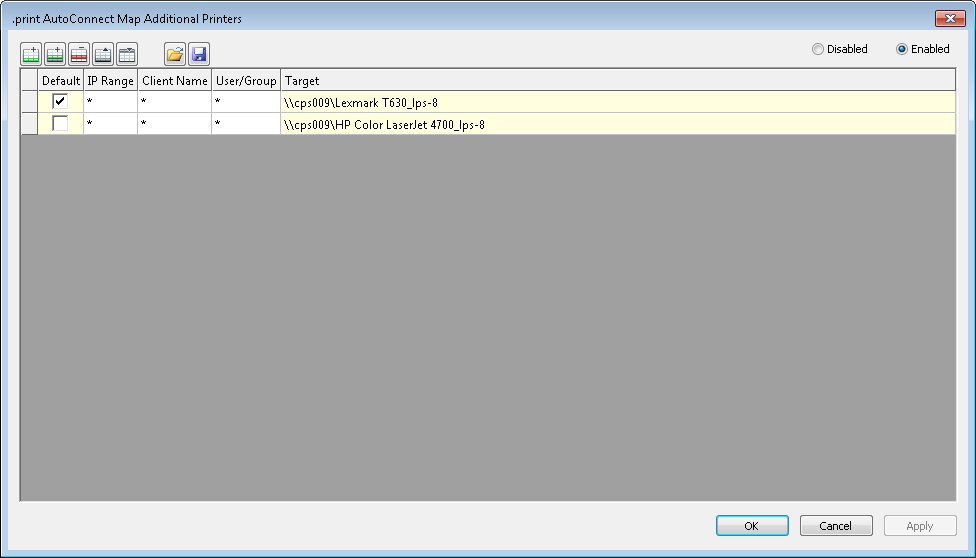
Map Additional Printers: enabling and entering rules
- Perform an update of the group policy for the terminal server and/or virtual desktops.
- Start a session on the terminal server or virtual desktop and perform a test prints to the printers automatically mapped by AutoConnect.
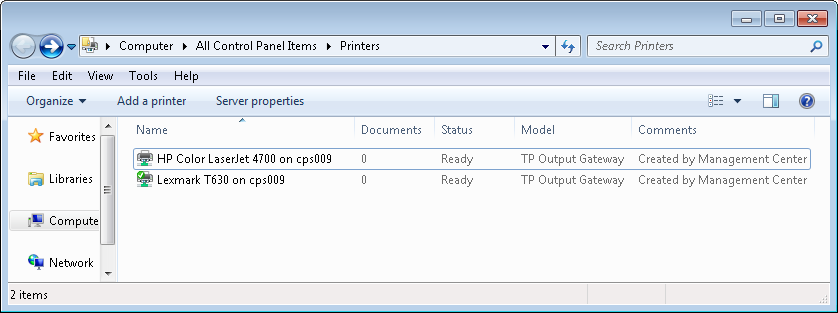
two printers mapped in a session by AutoConnect
Printers connected locally to workstations or thin clients
Requirements
- Installed on terminal servers or virtual desktops are:
- The virtual printer driver TP Output Gateway (v8.0 or later)
- The ThinPrint mapping component AutoConnect (v8.0 or later)
- ThinPrint Engine is installed on the central print server (v8.0 or later).
- Installed on the workstation or the Thin Client are:
- Printers
- ThinPrint Client (TCP/IP type)
- Management Center is installed on a separate computer or on the central print server.
path of the print data: desktop→ central print server→ workstation→ printer
Procedure
- If you have not already done so, set up a branch as Location (here: Helsinki).
- Set up the workstation. To do so, select All ThinPrint Client Devices→ New. Enter the host name of the workstation (here: ws-87), select the location (here: Helsinki), and click Create and Close to confirm.
entering the workstation’s host name (or IP address)
- With the command Get Configuration, request the printers list of the ThinPrint Client, which runs on ws-87. Click OK to confirm the subsequent notification. The printer list will be shown.
retrieving ThinPrint Client’s printer list with Get Configuration
printer from ws-87 will be shown
- If you have not already done so, set up the central print server.
- If you have not already done so, set up an object for the Connection settings (here: HLSNK).
Caution! To avoid database errors with creating a new Connection please note the following:
• Do not use the underscore character ( _ ) in the Connection name.
• Avoid entering the same Connection name twice.
- Now set up the printer object. To do so, select Edit Printers in the Connections context menu (here: HLSNK). Enable the required printer (here: Kyocera), enable V-Layer (Printer Type column), and assign to the printer one template with a native driver (Normal Template column) and one template with TP Output Gateway (V-Layer Template column). Click OK to confirm. (The V-Layer print mode is recommended for sending print data to non Windows clients as well as to centralize all printer drivers on the central print server.)
selecting Edit Printers for the Connection
Select All and V-Layer (Printer Type column) and the native drivers (Normal Template) and Output Gateway templates (V-Layer Template)
Create printers on the central print server
Thereby you will automatically create the printer you have just selected on the central print server:
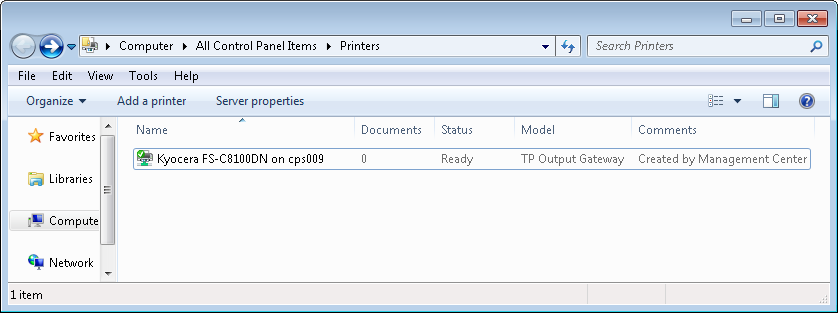
- Select Apply Configuration to create printer objects for the central print server or for the corresponding Connection. Click Yes and OK to confirm the subsequent messages. The following screenshot shows the result displayed in the printers folder of the central print server. The Output Gateway objects of the V-Layer pairs will be connected into the session, here: Kyocera FS-C8100DN, Lexmark T630, HP Color LaserJet CP2020 and HP Color LaserJet 4700
result: A new V-Layer printer pair has been created on the central print server (here: Kyocera)
Configuring AutoConnect
Because, in this scenario, ThinPrint Engine sends the print output to printers installed locally on workstations or on Thin Clients that’s where the ThinPrint Client is installed. Therefore, the printer mapping is carried out here with AutoConnect’s Dynamic Printer Matrix.
You don’t have to completely enter all the contents of Dynamic Printer Matrix again. You can export it from Management Center, import it into the Dynamic Printer
Matrix and edit it there if required. To do so, proceed as follows:
- In the Central Print Servers node, select the menu item Export to CSV from the Management Center configuration console.
Enter a file name, and click Save to confirm. - Switch to Dynamic Printer Matrix on the terminal server or in the group policy configuration. Select Import Configuration there and then the newly exported .csv file. Click on Open (lower arrow).
Caution! An existing configuration will be overwritten.
- The new Dynamic Printer Matrix configuration is displayed. Click on OK to close Dynamic Printer Matrix.
new Dynamic Printer Matrix configuration
- Perform an update of the group policies for the terminal server and/or virtual desktops.
- Start a session on the terminal server or virtual desktop and perform test prints on the printer automatically mapped by AutoConnect.
printer mapped in a session by AutoConnect
Local printers for mobile or home users
Preconditions
- Installed on terminal servers or virtual desktops are:
- the virtual printer driver TP Output Gateway (v8.0 or later)
- the ThinPrint mapping component AutoConnect (v8.0 or later)
- Virtual Channel Gateway (v8.0 or later) to deliver the print output via ICA, RDP or PCoIP
- ThinPrint Engine is installed on the central print server (v8.0 or later).
- Installed on the workstation or ThinPrint Client are:
- printers
- ThinPrint Client (RDP type) or ThinPrint Client (ICA type)
- Management Center is installed on a separate computer or on the central print server.
path of the print data: desktop→ central print server→ desktop→ workstation→ printer
Procedure
- Set up an object for the ThinPrint Clients of mobile or home users on the Management Center’s configuration console. To do so, select Locations→ New. Enter a nominal branch name (here: Mobile or Home Users), and click Create and Close to confirm.
entering nominal Location for mobile or home user
entering the nominal branch name
- Set up a (nominal) ThinPrint Client device. To do so, select All ThinPrint Client Devices→ New.
adding ThinPrint Client
- Specify a nominal host name (here: VCG), select the location (here: Mobile or Home Users).
entering nominal host name and printer name
When putting in the printer it is important to distinguish between three different cases:
- Case 1: Windows workstations are used, and the print jobs will only be sent to the standard local printer.
- Case 2: Windows workstations are used. If multiple printers are connected, they need to be able to be specifically selected in a session (Prerequisite: ThinPrint Engine version 8.6 or later).
- Case 3: Non-Windows clients are used. Here, the native driver must be assigned. (Prerequisite: ThinPrint Engine version 8.6 or later).
Case 1:
- Enter a printer name in the Printer Name column with which users in a session are to print to their local default printer (here: mobile or home). Select TP Output Gateway as the driver (if it’s not already displayed in the Driver colum add it, using Add New Driver). Don’t enter a printer ID; this is not necessary here because the print data will be sent to the workstation’s default printer (the ThinPrint Client’s Current Printer respectively). If
-1is given as printer ID, please do not delete this.
Case 1: defining only one Output Gateway printer
Case 2:
- Enter a name in the Printer Name column for each printer model installed on the Windows clients (the spelling must match that on the Windows clients). In each case, select TP Output Gateway as the driver. Don’t enter a printer ID; this will be automatically determined later, by AutoConnect.
Case 2: defining an Output Gateway printer for each printer model
Case 3:
- Enter a printer name in the Printer Name column for each printer model installed on non-Windows clients (the spelling must match that on the clients’ devices). In each case, select that driver with which the print jobs are to be rendered (if these are not already displayed in the Driver column add them, using Add New Driver). Don’t enter a printer ID; this will be automatically determined later, by AutoConnect.
Case 3: defining a printer and allocate a native driver for each printer model
- Click Create and Close to close the New ThinPrint Client Device menu.
- If you have not done so already, set up the central print server.
- Set up an object for the Connection settings (which are stored in the ThinPrint Ports). To do so, select Connections→ New. Enter a name for the Connection (here: VCG), select the central print server and the location, and click Create or OK to confirm and Close.
adding a Connection
Caution! To avoid database errors with creating a new Connection please note the following:
• Do not use the underscore character ( _ ) in the Connection name.
• Avoid entering the same Connection name twice.
New Connection with Connection settings
- Now set up the printer objects. To do so, select Edit Printers in context menu of the Connection (here: VCG). Enable the desired printers (all with Select All).
Cases 1 and 2:
- In each case, select TP Output Gateway as Normal Template.
- Click OK to confirm.
Case 3:
- In each case, enable V-Layer, and assign to each printer one template with a native driver (Normal Template column) and one with TP Output Gateway (V-Layer Template column). (The V-Layer print mode is recommended for sending print data to non Windows clients as well as to centralize all printer drivers on the central print server.)
- Click OK to confirm.
selecting Edit Printers for the Connection
selecting printers and print mode and assign drivers (example for case 2)
Create printers on central print server
The newly selected printers are then created automatically on the central print server:
- To create the printer objects, select Apply Configuration either for the central print server or for the respective Connection. Click Yes and OK to confirm the subsequent notification.
selecting Apply Configuration for the central print server
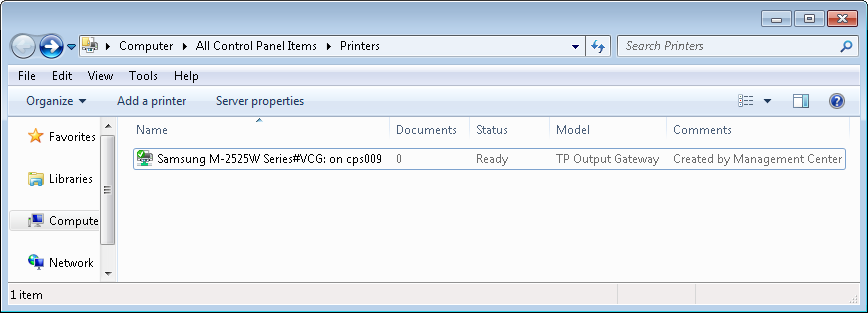
The result in the central print server’s printers folder is shown in following screenshot.
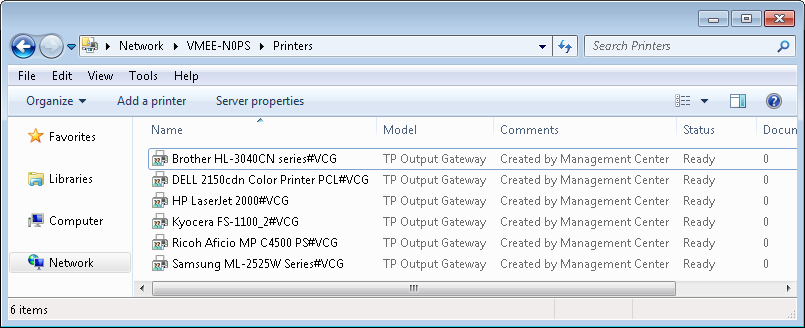
printer has been created on the central print server (example for case 2)
Configuring AutoConnect
Because, in this scenario, ThinPrint Engine sends the print jobs to printers installed locally on the workstations or on Thin Clients that’s where the ThinPrint Client is installed. Therefore, printer mapping is carried out here by the Dynamic Printer Matrix of AutoConnect.
You don’t have to completely enter all the contents of Dynamic Printer Matrix again. You can export it from Management Center, import it into the Dynamic Printer Matrix and edit it there, if required.
- After that, the Dynamic Printer Matrix configuration for mobile and home users is shown. Click on OK to close Dynamic Printer Matrix.
Dynamic Printer Matrix: Management Center configuration has been imported
- Perform an update of the group policies for the terminal server and/or virtual desktops.
- Start a session on the terminal server or virtual desktop and perform a test print on the automatically created printer.
printer mapped in a session by AutoConnect (example)