Adding a Connection
In a Connection, the settings of the ThinPrint ports to be created on the print server will be defined. For setting up a Connection, see section Praxis: Creating and connecting printers.
Caution! To avoid database errors with creating a new Connection please note the following:
• Do not use the underscore character ( _ ) in the Connection name.
• Avoid entering the same Connection name twice.
On this, see the message “Value cannot be nul. Parameter name: collection”.
You can make the following settings for a Connection:
Control Bandwidth
Enter a maximum value for the bandwidth (recommended value: 50 % of the available bandwidth of the connection to the branch office involved.) Also select the number of ThinPrint Ports, with which the printer objects to be created (those that send print data via ThinPrint Engine) are to be connected; this option is called Port Pooling, the number of ThinPrint Ports is equal to the number of print jobs that can be processed simultaneously.
Note! With Number of ThinPrint Ports per central print server don’t specify more than 20 to 25 Ports because each printer of this Connection must be assigned to all ports and the printer creation would be time consuming. Additionally, the general rule is:
(length of Connection name + 4) x number of ports ≤ 200
To perform more print jobs simultaneously we recommend the One port per printer option or splitting the respective Connection into multiple Connections.
One port per printer
As an alternative to Port Pooling (see above), you can also allow a separate printer ThinPrint Port to be created for each printer object.
Use encryption
See the section Encryption of print data.
Default printer configuration
See section Preset the print mode.
Share native V-Layer printer objects
V-Layer pairs usually consist of a shared Output Gateway printer object, and a non-shared native printer object. With this option, you can also share the native printer object.
Publish shared printers in AD
You can specify here whether the printer objects should also be listed in the directory – that’s equivalent to the Windows option List in directory (AD).
Client connection settings
Here you can define how, and with which protocol, the print data should be sent to the ThinPrint Client (TCP/IP vs. Connection Service vs. ICA or RDP).
- directly to the ThinPrint Client’s IP address (Connect to ThinPrint Client directly)
- to Connection Service’s IP address, from where the ThinPrint Client retrieves it’s print orders (Connect to ThinPrint Client via Connection Service)
- to the IP address of Virtual Channel Gateway (that is running on a RD Session Host or virtual desktop) and from there, via ICA or RDP, to the ThinPrint Client (Connect to Virtual Channel Gateway)
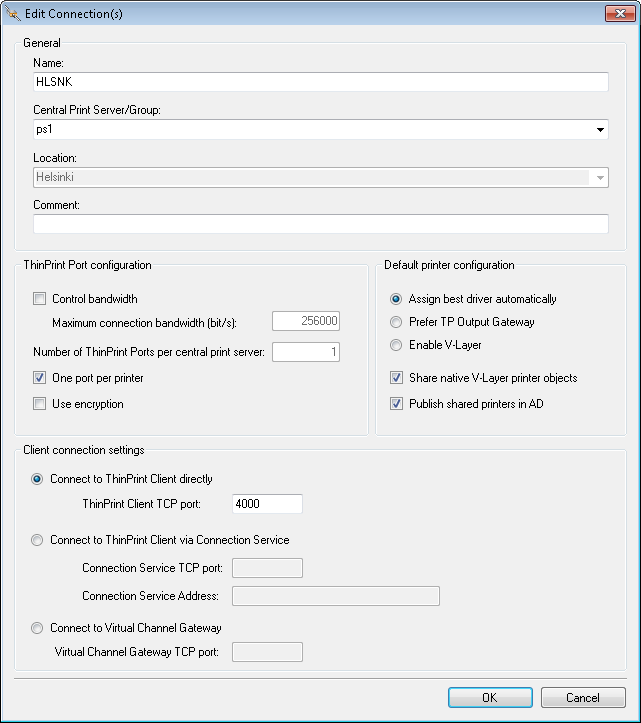
settings of a Connection
Deleting a Connection
- To delete a Connection, firstly remove all printers of this Connection and secondly select Remove in the Connection’s context menu. Thirdly select Apply Configuration to delete it.
- Repeat Apply Configuration if it didn’t work with the first attempt. It’s also possible to select Force Remove after the first attempt (upper arrow in the second screenshot).
- Force Remove can also be used if the printers weren’t be removed before. However, in this case the printers won’t be removed from the print server.
removing a Connection
selecting Apply Configuration to delete the Connection