Overview
The (native) printer drivers required for your print environment may come from various sources. We distinguish between:
- Printer drivers provided by the printer manufacturers
(for which an own .inf file is available) - Printer drivers provided by the operating system
(drivers shipped with Windows)
For your print environment, you must decide whether you want to centralize or decentralize the installation and management of the printer drivers. Decentralized would mean that the printer drivers are installed on the local print servers and also on the workstations, if applicable. Centralized would mean that all printer drivers are installed on the central print server(s) – but not on Windows terminal servers (RD Session Hosts), workstations or virtual desktops.
You can use the methods below for centrally providing printer drivers:
- So that the Management Center does not also have to transmit and install the printer drivers when printers and printer ports are created remotely, manually install all printer drivers on the central print servers. (Option Install Driver deactivated in the Driver Pool)
- So that the Management Center can (remotely) install the drivers when printers are created, set a Driver Pool and copy all printer drivers to it; file format: .inf, (not .exe, .zip or similar; option Install Driver activated)
- In addition to the Driver Pool you can specify a Template Server on which the Management Center pre-installs all printer drivers. Presettings and user permissions of the template printers installed on the Template Server will be assigned to the printers installed (with their installation) on the central print servers by the Management Center (e. g., printer options like duplex unit, additional paper trays, or the default paper tray). For the print mode Driver Free Printing additional presettings of the printers installed on the client machines are assigned to the printers on the central print server. Presettings include for example paper formats, trays or duplex.
- Best practice: Use the Template Server for test installation of printer drivers instead of the – possibly productive – central print servers.
Setting up the Driver Pool
- Create a directory for the driver pool (recommended: on the local host) and copy to there all printer drivers with their .inf files.
- Start the Management Center console.
opening the Management Center console
- Select Set Path to Driver Pool in the context menu of the Central Print Server Drivers node.
specifying the path to the Driver Pool
- In the following window, you can either enter the UNC path to the Driver Pool manually or search for it using the Browse function.
Click OK to confirm.

entering the path to the Driver Pool or use the Browse button
- Select Enable Template Server in the Extra→ View menu.
enabling Template Server
Printer drivers
In the Driver Pool, set up every printer driver which Management Center is to install remotely or for which you need a template. That way, the driver information to be managed is written into the SQL database. There are two options available to do this, as listed in the Overview section (drivers with an .inf file or drivers shipped with Windows).
Option 1: Drivers with an .inf file
- Select Add a Driver Using .inf File in the context menu of the Central Print Server Drivers node.
Alternatively, you can select Browse for New Drivers. Here you name a computer, on which the required drivers are already being used, click on Get new Drivers, and then select the preferred driver with Add.
nominating a computer, click on Get new Drivers and select with Add
- A window opens, as shown in following screenshot. Click here on Add.
clicking Add to add the driver
- Select the .inf file of the preferred driver in the Driver Pool. Confirm by clicking on Open.
Driver Pool: selecting the .inf-file of the preferred driver
- Select the driver, and click OK to confirm.
selecting driver
- The HP driver shown here supports both architectures: 32 bit (= x86) and 64 bit (= amd64 or x64).
However, many drivers support only one of the two architectures. If you still want to use both architectures’ versions of these drivers, then you have to add both drivers individually with Add.

two .inf-files selected: one for x64 and one for x86
- If you also want to ensure that Management Center remotely installs and updates the drivers, then, additionally enable the option Install Driver or Update Driver. Click on OK to confirm.
The following screenshot shows the example result; two drivers for each of two architectures have been added:
- 32- and 64- bit version of HP Universal Printing PCL 6
- 32- and 64- bit version of Xerox Global Print Driver PCL6
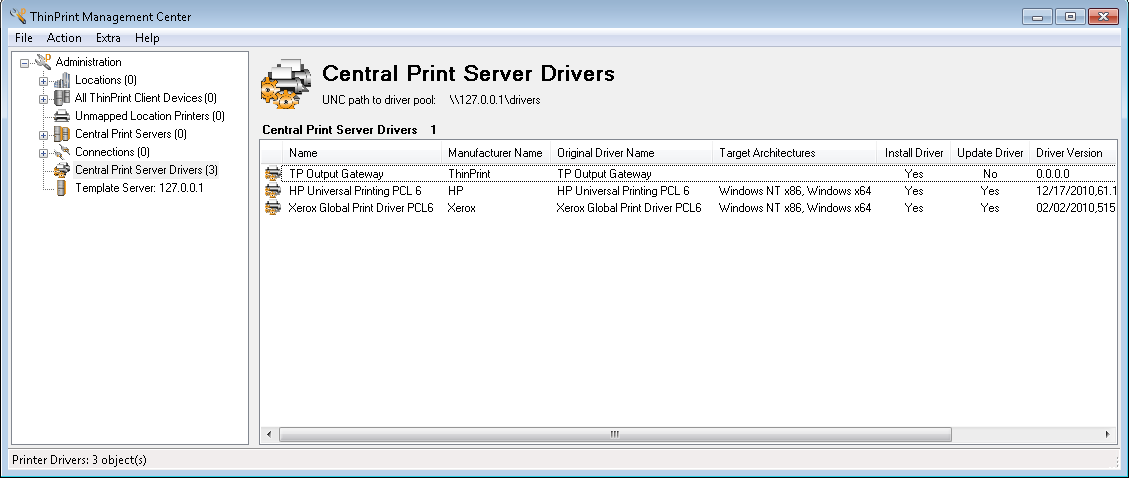
printer manufacturers’ drivers set up for different architectures
- No .inf file was specified for TP Output Gateway, because it is generally already available as a component of ThinPrint Engine on all print servers which are to be configured. If you also want to achieve an update management at his point, then enter an .inf file here (with Edit in the context menu) and enable the option Update Driver.
After ThinPrint Engine installation you will find the Output Gateway driver files on the print server in the directory
C:\Program Files\Common Files\ThinPrint\Virtual Printer\TPOG3
Copy the directory TPOG3 into your Driver Pool.
adding driver information for TP Output Gateway
Option 2: Drivers shipped with Windows
As an alternative to option 1, you can use those drivers shipped with the operating system (recommended). Windows 7 is shipped with around 2000 printer drivers. Running a Windows update in Print Server Properties of the local host increases that number, to a current total of about 5000.
Windows Update for printer drivers
- Following the update and the driver installation, go to Management Center’s configuration console and select Add a Driver Shipped with Windows from the context menu of the Central Print Server Drivers node. The window in the following screenshot opens. Select a printer manufacturer, and confirm by clicking on Filter.
selecting a printer manufacturer, here: Hewlett-Packard (HP)
- Select the driver, and click OK to confirm. The added driver will appear in the overview Central Print Server Drivers.
selecting printer model, here: HP LaserJet 5
Windows internal driver set, here: HP LaserJet 5
Setting up the Template Server
Requirement: The Template Server should already be enabled. After setting up the Driver Pool (see above), the template printers to be installed appear in the Template Server node, although still with grayed out icons. If the column Central Print Serv Driver is empty yet, the templates were written into the database, but not yet installed on the template server.
- If you want to install several templates for specific printer drivers (because, for example, you have several printers running with the same driver, but with different hardware configurations), then firstly select New in the context menu of the Template Server node (upper arrow).
template server node’s context menu
- The Menu will appear. Select the name of the additional template, and click on Create.
choosing another templates for the same driver
- To install the templates, you now select Apply Configuration to Template Server.
Following successful completion of this operation (it may take a few minutes), you will receive the notification “The operation has been successfully completed”. Otherwise (if not successful), a red icon will appear in the bottom right of the configuration console.
template installation possibly failed
- With a double click on the red icon you can open the message history, which presents you error messages (see section Troubleshooting).
- Occasionally a printer driver can not be installed remotely. In this case, simply install the driver manually in the printers folder or in the print management on the target computer. Then repeat Apply Configuration to Template Server (see above).
- Now you can implement those default settings that should be used for creating the target printers on the central print servers. To do so, select the Properties of each template individually in Template Server’s printers folder or print management.
putting the default settings on the templates
Deleting and recreating a template
- Mark the relevant template(s) and select Remove in its context menu.
- Select Apply Configuration to Template Server.
- Disable the template server (Extra→ View→ Enable Template Server) and enable it again.
- Select Apply Configuration to Template Server.
Which printer property is preset where?
Basically there are two types of templates which can be used for presetting printer properties:
- templates with Output Gateway driver
- templates with native drivers
Furthermore, with Driver Free Printing mode the presettings are performed at the printer objects on the client computers (e. g. local print servers). The following table shows which driver setting is configured where – with the print modes; on this, see the section Driver Free Printing vs. V-Layer vs. Native Printing.
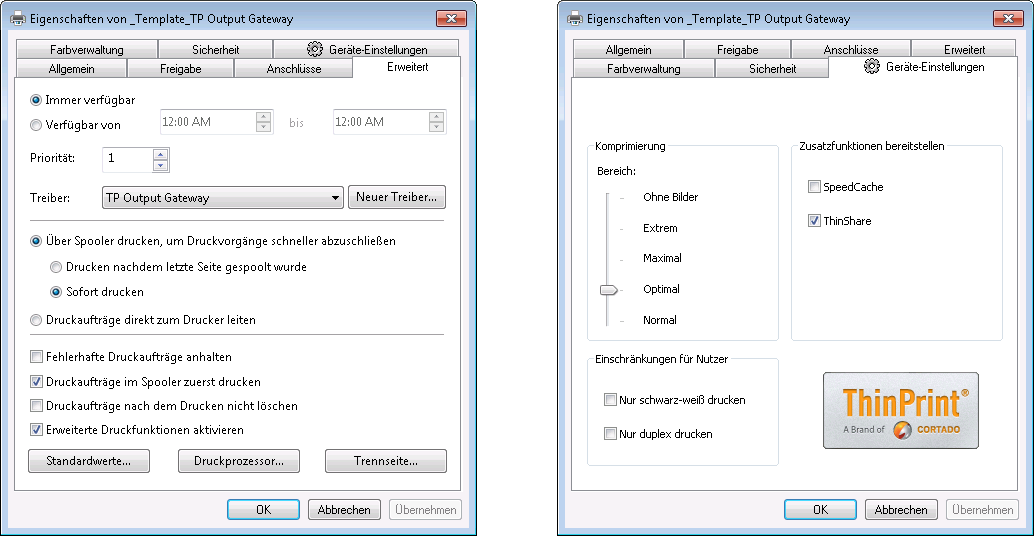
driver settings using the example of an Output Gateway template
| Driver Free Printing | V-Layer | Native Printing | |
| General tab | |||
| Location | ThinPrint Client machine | native template | native template |
| Comment | ThinPrint Client machine | native template | native template |
| Advanced→ Printing Defaults tab | |||
| Paper size + Paper source | ThinPrint Client machine | native template | native template |
| Color + Print quality | ThinPrint Client machine | native template | native template |
| Orientation + Print on both sides | ThinPrint Client machine | native template | native template |
| Number of copies | Output Gateway template | native template | native template |
| Open my printing preferences + Print preview | Output Gateway template | — | — |
| Scale to fit + Adjust margins | Output Gateway template | Output Gateway template | — |
| Finishing options | ThinPrint Client machine | native template | native template |
| Compression level | Output Gateway template | — | — |
| Security tab | |||
| Permissions | Output Gateway template | native template | native template |
| Device Setup tab | |||
| Compression range | Output Gateway template | — | — |
| SpeedCache + ThinShare | Output Gateway template | Output Gateway template | — |
| Black and white only + Always use duplex | Output Gateway template | Output Gateway template | — |
The abovementioned ThinShare configuration applies only to workstations and virtual desktops. For terminal servers see the ThinShare section.
Device settings with universal printer drivers
Universal drivers from printer manufacturers need – at least once – a connection to a physical printer to be able to retrieve device settings. In this case, choose a typical printer from your network on which as many as possible device options are installed (depending on device settings, it could be useful to use multiple templates per driver). Proceed as follows:
- Create an own Standard TCP/IP Port for the relevant template and connect the template to this new printer port.
- Enter the physical printer’s (IP) address in the Standard TCP/IP Port settings.
port configuration: entering the IP address of a physical printer
- Retrieve the device settings from the physical printer. To do so, mark the relevant template in the Windows Print Management and execute one of the following functions:
- Properties→ Device Settings→ Automatic Configuration→ Update Now
(e. g. with HP Universal Printing PCL 6) - Properties→ Extended Settings→ Set Up
(e. g. with Kyocera Classic Universaldriver PCL6) - Properties (e. g. with Konica Minolta Universal PCL, Ricoh PCL6 Driver for Universal Print and Samsung Universal Print Driver)
- Properties→ Advanced→ Printing Defaults
(e. g. with Brother Universal Printer and Epson Universal Laser P6) - Properties→ Device Settings→ Get Device Status
(e. g. with Canon Generic PCL6 Driver) - Properties→ Device Options→ Get Printer Settings
(e. g. with OKI Universal PCL 5) - Properties→ Install Options→ Ask Printer (e. g. with Lexmark Universal)
- Properties→ Administration→ Xerox Update
(e. g. with Xerox Global Print Driver PCL6)
- Properties→ Device Settings→ Automatic Configuration→ Update Now
Note! Because of the performance, make sure that the properties of the relevant printers are retrieved only manually but not automatically.
The settings received here will be transmitted by the Management Center when installing printer objects in the modes V-Layer and Native Printing (for this, see the following chapter). Before creating printers with the Management Center it may be necessary to perform a print job using the respective template-for instance with the Oki C5510 driver because it doesn’t completely send its printer properties until the first print job is received.
opening the properties of a template (example for Brother)
retrieving device settings from an HP printer
retrieving device settings from a Kyocera printer
Device settings with KPDL drivers
- With the Kyocera Printer Driver Language (KPDL) sometimes there are be problems with printing PDF documents. If a print job – for example – hangs in the printer queue and then vanishes or the printout is inaccurate you can change from KPDL to another printer driver language in the driver settings.
- Alternatively you can set the EMF spooling option.
selecting a printer driver language with a Kyocera driver (example)
enabling EMF spooling with a Kyocera driver (example)