Personal Printing, ThinPrint Engine and Tracking Service
Enabling service account for printing
Installation of Tracking Database
Managing the tracking database
Installing the Tracking Report Engine
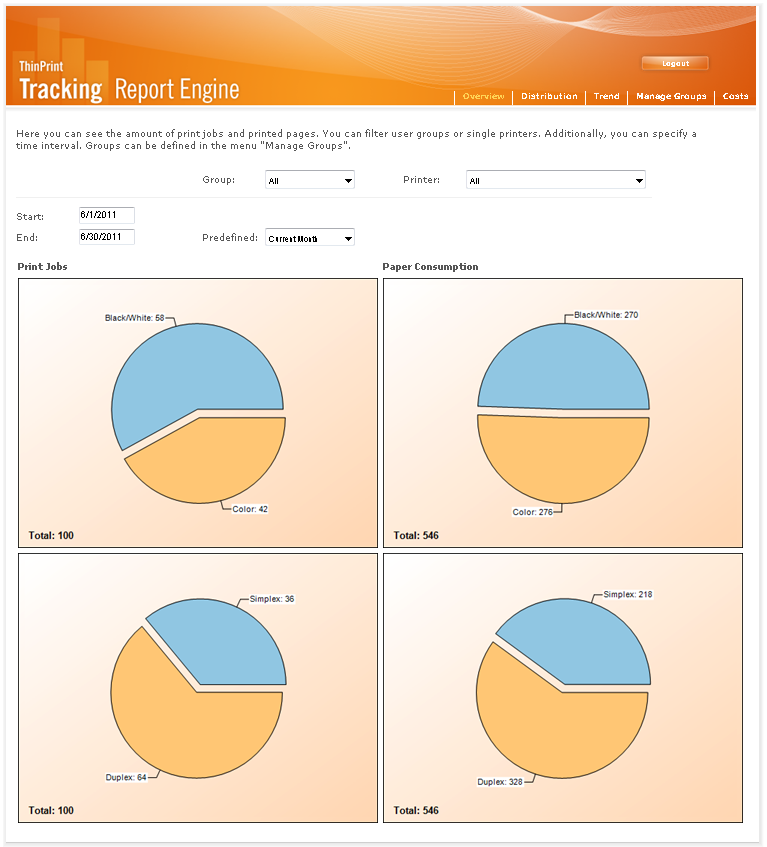
Analyzing tracking data using the Tracking Report Engine
The ThinPrint Tracking option allows you to oversee your print volume: How many printers are overloaded? Which are hardly used? How many color or black&white printouts are printed on a daily basis? What are the resulting costs?
How it works
The print data of ThinPrint Ports is compiled by the server and transferred into an SQL database. From there, they can be graphically presented as a website using the Tracking Report Engine, which also allows for many other settings, such as querying print volumes for a certain branch during a certain time period. Authorized individuals can access the website from anywhere.
Print job tracking has the following components:
- ThinPrint Engine or Personal Printing
sends data to the ThinPrint Tracking Service - ThinPrint Tracking Service
receives data and writes it to an SQL database - ThinPrint Tracking Report Engine
web component for clear analysis, summary, and graphic report of tracking results
Tracking is part of the following ThinPrint products:
- ThinPrint Engine
- Personal Printing
If not yet installed, an SQL server must be installed to enable use of the tracking feature within the ThinPrint Engine. This program is not included in the ThinPrint Engine software.
Personal Printing, ThinPrint Engine and Tracking Service
If you use Personal Printing either together with Tracking Service (included in Personal Printing) or with ThinPrint Engine (not included), please note the following instructions.
Order of installation
It is recommended that you install each of the Personal Printing, Tracking Report Engine, ThinPrint Engine, and ThinPrint License Server components on separate servers. Two exceptions are the combinations:
- ThinPrint Engine + Personal Printing
- License Server + ThinPrint Engine
So if you want to install Personal Printing on a print server together with the ThinPrint Engine, please follow the following sequence:
1. ThinPrint Engine
2. Personal Printing
Note! The Tracking Report Engine must not be installed together with Personal Printing, ThinPrint Engine or License Server on the same computer. To do this, use a separate web server.
Enabling service account for printing
Since version 10, the ThinPrint Engine is equipped with a license server. If ThinPrint is used additionally, the service account which is to be created for Personal Printing installation and configuration (see User account for installation) must be enabled for printing on the License Server.

Personal Printing's service account on the ThinPrint license server
Tracking Service
You can gather information about the print jobs sent with the ThinPrint Engine for your statistics (tracking). To do so, you must set up a Microsoft SQL server. The ThinPrint Engine sends its tracking data to the server that has the tracking service installed. Print data which can be analyzed and displayed by Tracking Report Engine are:
- Author of a print job (user/group)
- Printer used
- Settings used
- Number of pages printed
- Information on any errors
- Costs
- Compression rates (ThinPrint Engine only)
- Print duration
- Print data during a defined period
The SQL server can collect print data from different sources – from ThinPrint Engines on application or print servers or from Personal Printing servers.
Tracking Report Engine
ThinPrint Tracking includes a web application for viewing the tracking data. This program represents the SQL data graphically in its web interface – installed on a web server. The tracking data can therefore be analyzed from the web browser on any workstation.
Technical requirements
Your architecture must meet the following requirements for running ThinPrint Tracking:
- The SQL server additionally requires:
- Microsoft SQL Server 2005 Express and later
- The ThinPrint Tracking Report Engine can be run on the following servers (as a web server):
- Windows Server 2012 R2
- Windows Server 2012
- Windows Server 2008 R2 SP1
Note! The Tracking Report Engine must not be installed together with Personal Printing, ThinPrint Engine or License Server on the same computer. To do this, use a separate web server.
The following is required:
- Microsoft .NET Framework 3.5 SP 1
- ASP .NET (can be enabled as a Windows component or installed as a part of the .NET Framework)
- Internet Information Services (IIS) 5.1 or later. Port 80 is used by default. Do not change this port number and make sure that no other programs are using this port.
Administrator permissions are required for all installation and configuration procedures.
Please note with ThinPrint Tracking, that data printed via a ThinPrint Port is collected.
Installation of Tracking Database
To install the tracking database, please follow the steps below:
- Copy Setup.exe onto the SQL server and open it.
- Select the desired language → InstallShield Wizard opens and click Next

- Select the SQL server, on which you wish to install the Tracking database.
- Then specify how do you wish to access the database:
- Windows authentication
or - SQL server authentication
- Windows authentication
- Confirm with Next.

- Choose a name for the database in which the information about print jobs will be stored: tptrack1 for example.
- In case of a software update, you can select an existing database by clicking on the button Browse. Confirm with Next.

Selecting authentication mode
By choosing the authentication mode, you have defined how Report Engine administrators and the tracking service access the data.
SQL server authentication
- Create an account with administration permissions, TrackingService for example. Or specify an existing one.
- Note the user name and password. Confirm with Next and close InstallShield Wizard with Finish.

Windows authentication
If you choose Windows Authentication, all users and servers need to be members of the same domain. Users can log on with their user name and their domain password.
- Choose Windows authentication and confirm with Next.

You can select user groups from the Active Directory which should be able to access Tracking Database. For this, click Advanced.

During installation of Tracking database, Tracking database administrators with read and write permissions will be created, as well as users with read permissions only.
 Finally, conclude Tracking database installation in InstallShield Wizard with Install and Finish.
Managing the tracking database
- Open a management tool for the database, as for example Microsoft SQL Server Management Studio Express. With this tool, you can administer the database created by the installer.

With SQL authentication
When you install Tracking database with SQL authentication, a user account will be created with read permissions on the database. This name of the user account will be TrackingUser.
- To access the SQL server remotely, open SQL Server Configuration Manager and enable the protocols Named Pipes and TCP/IP.

- Then start the SQL server browser in the Services folder.

With Windows authentication
- To ensure the Tracking Service gets access to the SQL server, open Management Studio Express and enter with a right click in the folder Security on New and Login.

Create a new account according to this sample:
<domain>\<tracking service address>$In this example:
ourdomain\tp-server07$

- Put a checkmark at the database, which is configured for Tracking, here: tptrack1 (arrow above) and a checkmark at TREAdmin (lower arrow).

Now Tracking Service can access the database with Windows authentication.
Installing the Tracking Report Engine
See the section Installing the Tracking Report Engine on a webserver.
Analyzing tracking data using the Tracking Report Engine
See the section Analyzing tracking data.
SQL database
See the section SQL database.