Installing the Personal Printing Client for Samsung printers
Authenticating on the Samsung printer
Installing the Personal Printing Client for Samsung printers
- Download the Personal Printing Client for Samsung printers (free) onto any computer.
- Enter the printer’s IP address in your browser to open the SyncThru Web Service page and login as an administrator.
- Select Maintenance→ Application Management and then click Add.
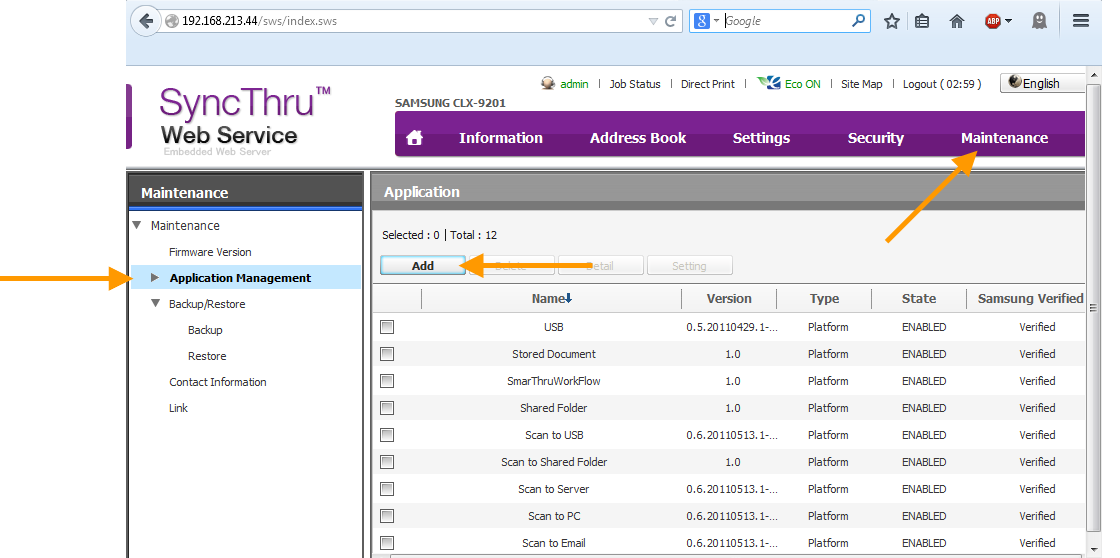
opening the Samsung printer’s web interface
- Click Browse and select the software PersonalPrintingClient.par.

Installing Personal Printing Client for Samsung
- Confirm the on-screen information with OK. Now you will find the Personal Printing Client in the Application area.

Personal Printing Client installed successfully
- Open Security→ System Log and enable Log Configuration: Job Log.

Enabling Job Log for Personal Printing
- Reboot the printer.
Preparing the Samsung printer
After you have installed the Personal Printing client, the menu item Personal Printing appears in the XOA menu. (The XOA menu only appears if Personal Printing or other XOA programs are installed.)

Personal Printing appears in the Samsung printer’s XOA menu
- Under Personal Printing Configuration you can make the necessary settings, which are explained below.

Samsung printer: Personal Printing configuration
| Server Address | Personal Printing server address |
| Port | Personal Printing server TCP port |
| Printer ID | Printer ID, as assigned for this printer by the Personal Printing server |
| Authentication Mode | The method by which the users authenticate themselves at the printer (User ID, User ID + PIN, RFID Card or RFID Card +PIN). On the Personal Printing server, Card with preset ID must be set as the authentication method. (If other applications, in addition to Personal Printing, are using NFC or RFID, it may cause problems when printing with Personal Printing. In that situation, we recommend you select RFID CARD + PIN.) |
| Default PIN | This field is only active when User ID or RFID Card (without additional PIN entry) are selected as authentication method. The value ... • with self-registration: ... must be the same as the Default user PIN in the console of the Personal Printing server, e. g. 0000 • with manual setup by the admin: ... must be the same as the User PIN in the users’ AD configuration on the Personal Printing server |
| Connection Method | Connection between the printer and the Personal Printing server: with (HTTPS) or without (HTTP) encryption. For HTTPS, an root certificate must be installed on the printer (go to Security→ Network Security→ Digital Certificate). In addition, on the Personal Printing server, Internet Information Services is configured for encryption and a server certificate (signed by the root certificate) is installed. |
| Server Timeout (s) | The time, in seconds, for which an attempt is made to reach the Personal Printing server. After the connection is lost; the login mask appears. |
| Application Timeout (s) | Standby time, in seconds, if a user is inactive in the Personal Printing client (printer display). After that time, the login prompt appears (user is logged off). |
- Confirm your entries by clicking Apply.
Saving configuration
- You can save the Personal Printing configuration, by clicking on Import/Export at left, and then on Export. You will be supplied with an eas. file (e. g. PersonalPrinting-CLX-9201.eas), which you can save on your computer and, when required, use the Browse button (below right) to locate it again and then import it.

import/export Personal Printing configuration
Authenticating on the Samsung printer
- For sending a print job to the Personal Printing server see the section Authenticating on the Lexmark printer.
- It the Personal Printing client has been correctly installed and configured, the Personal Printing icon shows on the printer display. (Depending on your printer model, the icons and graphical user interface may vary. The display language will be the same as the system language set in the printer.)
Click on this icon to print.

Personal Printing on the Samsung display
Depending on which authentication mode was set up (see above) you will see one of the following input masks.
Authenticating with User ID
- The users enter their User ID and confirm with Authenticate.

authentication with User ID without PIN
- If a PIN request was set additionally, the users must now enter their PIN and confirm with Authenticate.

authentication with User ID and PIN
Authenticating with NFC card
- Here the users will be prompted to place their NFC cards or tokens near the card reader.

authentication with NFC card without PIN
- If a PIN request was set additionally, the users must now enter their PIN and confirm with Authenticate.

authentication with NFC card and PIN
After successful authentication, the list of all print jobs triggered on the workstation appears in the printer display.
- You can tap to select one, or several print jobs or select all jobs with Select all.

Personal Printing with Samsung: print job overview
| Print (see the following screenshot) | Prints the selected print job/s. These will then be deleted from the list and from the Personal Printing server. A message shows that printing was successful. |
| Print & Keep | The selected print job, or jobs, are printed, but remain on the list and are available later for further printing. |
| Refresh | Refreshes the list of print jobs |
| Delete | After selecting one or more print jobs, you can delete them by clicking on Delete. A security prompt appears before deleting. |
| Details | Select a print job and click on Details. You will then see the document name, its size and the date it was created. |
| Cancel | If print jobs are being printed (Print), the current printing process can be stopped with Cancel. |

notification to confirm that printing was successful
Logging
Personal Printing authentication procedures an print jobs are logged automatically.
- To view or export logs, open the configuration console and select Security→ System Log→ Log Viewer.
- To change the log level, select Security→ System Log→ Log Configuration.

viewing or exporting logs

displaying Personal Printing and other logs
- To export a log, select Security→ System Log→ Task→ Export.

exporting Personal Printing and other logs