Adding computers and devices with ThinPrint Clients
You have three options for adding computers or devices to which the ThinPrint print jobs are to be sent:
- Call up the Search for ThinPrint Client Devices function in the context menu of the Locations node or the All ThinPrint Client Devices node. Here, you should use the comment column because search and addressing are carried out exclusively via IP addresses.
If not all IP addresses of ThinPrint Client devices are displayed, limit the IP address space, e. g.,.../24instead of.../22.
If a ThinPrint Client uses the Connection Service enter a range of Client IDs instead of the IP address range. Examples:1-100,11–45
For IP addresses, the following syntax applies:
IP address/significant bits. Example: 125.128.40.128/24
IP address/subnet mask. Example: 192.168.40.128/255.255.255.240
adding computers or devices in the Locations node
- For a faster approach, use the New function in the context menu of the All ThinPrint Client Devices node.
Note! If you are using the ThinPrint option High Availability Client, specify the name (address) of the respective HA group. The printers created by the Management Center on the print server then contain this address, but the ThinPrint Engine will send the print jobs automatically to the active ThinPrint Client.
adding computers or devices in the All ThinPrint Client Devices node
click Search to automatically search for ThinPrint Clients on the network
- If you have already a list containing your client machines or devices you can copy them into the file Import.xlt in the Management Center’s program directory. Saved as an XLS file you can import it into the Management Center (requirement: Microsoft Excel installed on the Management Center machine). The following Illus. shows the structure of such a table. On this, use the menu File→ Import Data.
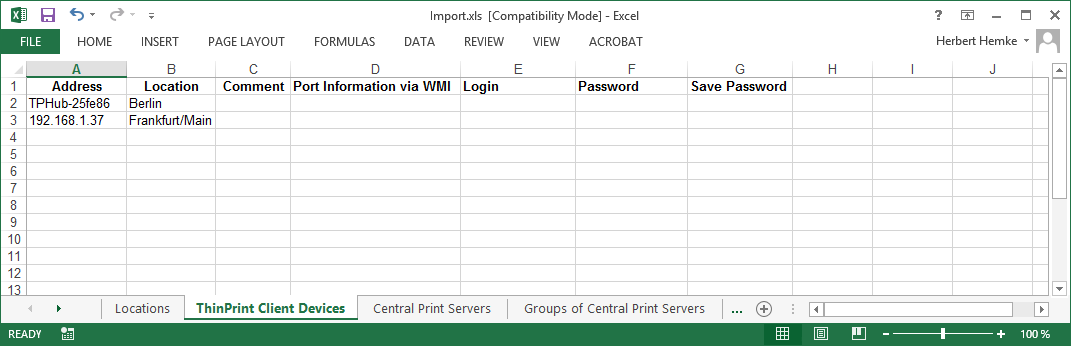
structure of the Excel file with additional information
Note! With File→ Discard Configuration you can reset the SQL database to reconfigure the Management Center. You will be prompted to save your current configuration.
Printer port information of the ThinPrint Client computers
If workstations, local print servers or appliances are running Windows (and if these devices can be accessed via TCP/IP), the Management Center can display information about the printer ports connected to the network printers; this is displayed in the properties of the ThinPrint Client devices.
- Select Edit for a node under All ThinPrint Client Devices.
setting up display of information about client-side printer ports
- Activate the option Get port information via WMI and specify, if necessary, an account of the pertinent Windows computer.
selecting Get port information via WMI
- Select Get Configuration for this ThinPrint Client. For Windows computers, you receive additional information on the Port and the Port Type.
columns Port and Port Type
Caution! To avoid database errors do not change the Location of an existing ThinPrint Client Device. On this, see the message “Object reference not set to an instance of an object“.
Remote configuration of ThinPrint Client Windows
Remote configuration is possible for ThinPrint Client Windows printing with TCP/IP protocol. The entry RmtConf is needed in the Windows registry of all client machines you want to configure.
- Open the Windows registry of the client machine you want to configure. Add the entry RmtConf (reg_mulit_sz) under
hkey_local_machine\software\thinprint\client. Enter the IP addresses of all those machines from which the client should be configured.
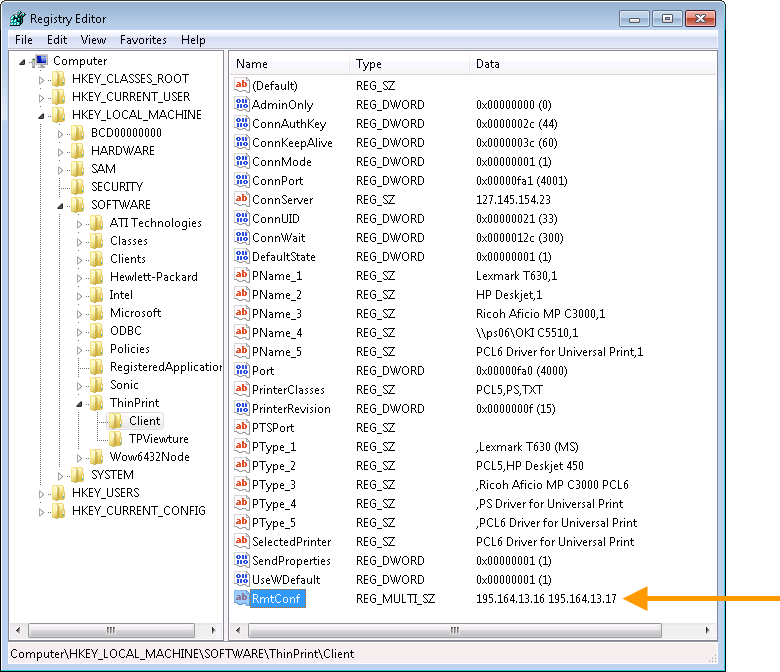
ThinPrint Client machine: Registry entry RmtConf added for remote configuration of ThinPrint Client
- Restart ThinPrint Client.
- Go to the Management Center and select Configure Client for the respective ThinPrint Client.
Management Center: Select Configure Client
- Now, the selected ThinPrint Client is ready for remote configuration.
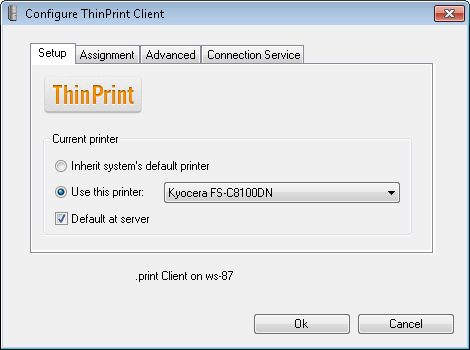
Management Center: Remote configuration of a ThinPrint Client